fried chicken

How to Make Fried Chicken Bites

Posted on
Follow Me on PinterestPin It

I love fried foods. As I’ve said before, I don’t own a frier because that would be so bad for me. But sometimes I just need some fried chicken. Is that just me? I made fried chicken bites for dinner and I thought I’d share.

I think my version is pretty easy. It can be a bit messy though. This time I used breadcrumbs I made from a loaf of bread from Panera, but I have used Panko and Progresso breadcrumbs as well as crushed Ritz crackers. I think I actually prefer the Ritz with some seasoning mixed into them and mixed into the flour/cornstarch bowl.

I could have left the chicken in bigger pieces or in stripes for chicken fingers but I like to chop it into smaller pieces because it cooks faster. Also, since it is the same thickness I don’t have to worry as much about some parts of the chicken being cooked and other parts still being raw.

For this recipe, the amount of everything depends upon how much you want to make. I was frying two chicken tender strips.

Ingredients:

  • boneless, skinless, chicken chopped up into bite sized pieces
  • corn starch
  • all-purpose flour
  • milk
  • egg
  • breadcrumbs
  • oil

1. In a small sauce pan, pour oil, I used canola, enough to make it about an inch or more deep. Again this depends upon your amount of chicken you’re frying.

2. Chop the chicken into bite sized pieces

3. In a bowl, mix 3 parts flour to 1 part cornstarch.  The cornstarch helps everything stick to the chicken better as opposed to just flour.

4. In another bowl, with a fork, whisk 1 egg with 1/4 cup milk

5. In yet another bowl have a lot of breadcrumbs.

fried chicken

The order is going right to left because my saucepan is to the left of the breadcrumbs and yes my counter is that tiny!

6. Now, coat in the flour, dunk in the egg wash, and cover with breadcrumbs the pieces of chicken.

7. Carefully drop the chicken in the oil to fry or else the oil could splash up.
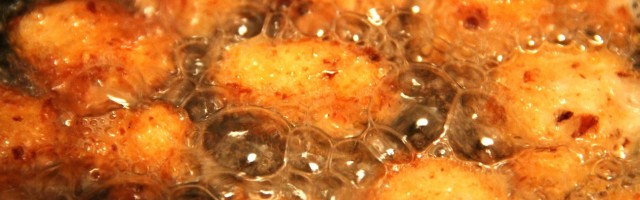
fried chicken

cooking in oil

Now my chicken wasn’t completely submerged in the oil, so I let it cook to a golden brown on the bottom, about 4 minutes and flipped them over with my tongs so the other side could fry an get a golden brown color as well.

7. With a slotted spoon, remove the fried chicken bites.

fried chicken

Yum!

Now it’s time to enjoy the fried deliciousness. I prefer to dip mine in a ketchup ranch combo. Am I the only one who does that?

I know the coat, dunk, and coat mixtures work pretty well for fried pickles too. I wonder if they work for cheese balls. I need to try it because I am missing some Culver’s cheese curds.


background complete

Paw Print, How to Cross Stitch

Posted on
Follow Me on PinterestPin It

After I drew my paw print pattern I got to stitching! Here’s how to cross stitch. First I’ll go a little backwards with photos of doing the cross stitch with a border I’m putting around it. But a starting note, remember, is that there is no knot at the end of the thread, you simply leave about an inch on the back side of the fabric.

step 1

take the needle through to the front side of the canvas from the bottom hole

step 2

pull through and go to the next row over, up and to the right diagonally, pull needle all the way through to the back of the canvas

step 3

next go to the hole directly underneath the hole in the previous step and pull the needle through to the right side of the fabric

step 4

after you’ve done another diagonal stitch, go to the hole underneath the one previously used and pull needle through to the right side of the fabric

step 5

now go up and diagonal to the left

step 5

now go up and diagonal to the left

step 6

the first X is complete and now repeat

step 7

go diagonal again to complete the second X

In my pattern I have a lot of half squares which could be confusing. But really it either means a half of stitch, literally a half of a stitch where the needle goes through the center of the square making the diagonal half of it’s usual length.

with green

Pattern Complete

This is the pattern complete! But I needed a way to finish it, make it actually look complete. So I decided to make a border around it.

green

It still quite wasn’t what I hoped so I added another border.

red and green

almost complete

That looks much better to me, so now I’m going to fill it in with a cream colored thread to leave no square unstitched.

background complete

background is filled in

To finish the stitching part of this I decided to backstitch around the paw print to highlight it. This is easier, I think, than back stitching in sewing because it has the holes to put your needles in to make your stitches the same length and it is often used as a finishing stitch in cross stitch.

Stitching is Finished!

I put a pencil next to it to give a size reference. Now I need to figure out how to turn this into an ornament.


More Cross Stitch Patterns

Posted on
Follow Me on PinterestPin It

I’ve drawn more cross stitch patterns! I’ve gotten the pattern making bug! But thank goodness for pencils and erasers because I used them a lot! 🙂

I made more patterns because I made Rusty a cross stitch pattern, which will be turned into an ornament that I decided my husband and I needed one too. Granted they are very basic, beginner cross stitch patterns, but they are my first group of patterns I’ve ever drawn. I can’t really draw that well to begin with but I wanted to try.

I have decided not to do a color legend for these because I wanted to keep my options open, as in, I wanted to make sure I had enough thread in my thread mess ball.

needle cross stitch pattern

my pattern

I couldn’t decide what to make for Joshua, my husband, so I sketched a couple of his hobbies and let him choose which one I made.

running shoe cross stitch pattern

running shoe

climber cross stitch pattern

mountain climber

snowboard and goggles cross stitch pattern

snowboard and goggles

He picked the mountain climber so now I have two more ornaments to stitch and make into ornaments! Still deciding on whether or not to backstitch the year onto it.

Graph paper really is a girls best friend when trying to draw cross stitch patterns.