Make Your Own Dress Form Links

Posted on
Follow Me on PinterestPin It

Ever wanted to make your own dress form? Me too! I have complied a list of tutorials to choose from. Pick the one that is best for you and good luck on your dress form making endeavors!

dress form


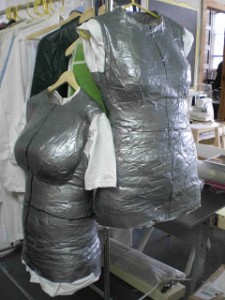
This how to is from The Esty Labs Archive gives a very detailed description with pictures to make a dress form out of a t-shirt and duct tape with the help of a friend. You can also jazz it up a bit by using colored or patterned duct tape.


dress form


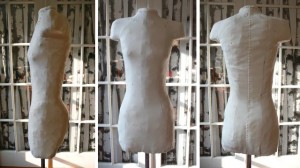
This paper tape dress form from Instructables is great idea with the use of paper tape, t-shirt, spray sealant foam and a friend. The instructions and pictures are extremely detailed.


dress form


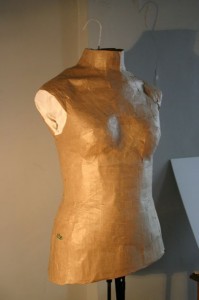
This dress form from Jezebel is probably the closest to buying the real thing, but it is also a lot more involved. It uses plaster bandages, sealant foam, IV cart to create your own stand for it to go on and sewing and creating a cover to cover the form.


dress form


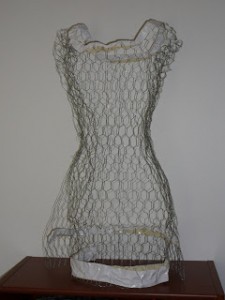
I love the creativity used to make this form. It seems to be so simple. Syzygyo of Worlds created one from chicken wire and some duct tape!


Also, if you have your own dress form already but it isn’t to you exact measurements, look at FabulousFit, they sell “fitting systems” which are pads you can buy to help make adjustments to any part of your dress form!


tortilla

Tortilla Recipe

Posted on
Follow Me on PinterestPin It

tortilla

I love soft shell tacos and love to make tacos at home. I decided I wanted to learn how to make tortillas. I’ve made these flour tortillas with two different types of flour, all-purpose and bread flour. Whichever flour I have the most of, that’s the one I use. All-purpose flour tends to be a little stiff but still good choice. Bread flour is chewier than all-purpose so it really depends on what you have on hand and what you prefer. My husband can barely tell the difference between the two so I don’t think it really matters.

Makes around 6 tortillas.

Ingredients:

  • 1½ cups of flour, bread or all-purpose
  • 1 Tbsp olive oil
  • 1 tsp garlic salt
  • ½ cup hot water

Directions:

  1. Pre-heat large skillet on medium heat.
  2. In a medium bowl, add all ingredients and stir until it becomes an elastic lump, about 5 minutes. If it’s too sticky, add some more flour. If it’s too dry, add some more water.
  3. Divide into 6 pieces and roll into balls.
  4. On a floured surface, place a ball and roll into a flat tortilla. *I can never get mine into circles. They’re always ovals or rectangles.
  5. Place tortilla onto preheated, non-greased, skillet. Cooking each side for about 5 minutes, until there are golden brown circles on it.
  6. Roll out another tortilla while one is cooking on the skillet. Repeat until all are cooked.
  7. Enjoy!

I like to make my tortillas before the rest of the meal, when I’m done making them I wrap them in tin foil so they stay warm while I’m making the rest of dinner. These can be refrigerated for a couple of days but are best when eaten on the same day.


hard boiled eggs

How to make Hard Boiled Eggs

Posted on
Follow Me on PinterestPin It

Every time I want to make hard boiled eggs I have to call my dad and ask how to do it. It really is a simple process but for some reason I can never remember how to do it. Well, I finally wrote it down and decided to share.

Get a sauce pan, with lid, large enough to put the eggs in a single at the bottom of the pan.

Put enough room temperature water in the pan to fully cover the eggs.

Place on stove and add a dash of salt and vinegar. I usually add rice vinegar but I’m not sure if it really matters what kind of vinegar you use.

Carefully place the eggs in the pan and put the lid on.

hard boiled eggs

Put the heat on medium and bring water to a rolling boil.

Turn the heat off and leave the eggs in the pan with the lid on for 15 minutes.

Remove lid and carefully remove eggs from pan with a slotted spoon.

Let eggs cool down and then peel and enjoy!

hard boiled eggshard boiled egg


shrimp ceviche

Shrimp Ceviche Recipe

Posted on
Follow Me on PinterestPin It

shrimp ceviche

A few summers back when my husband and I spent a couple of days in Miami we ordered a shrimp ceviche and the waiter politely told us that was fine but a shrimp ceviche isn’t a real ceviche because you have to cook the shrimp with heat, as opposed to traditional ceviche where the acidity in the juice cooks the fish, before you put into the vegetables. I’m not sure why it needs to be cooked first but it’s not a big deal because it actually speeds up the time from making to eating which is always a good thing.

Ingredients:

  • 10 or more medium-sized shrimp, peeled, tail removed and deveined (or be smarter than me and buy some that are already like that) cut into bite size pieces
  • 1/2 cup of fresh squeezed lime juice
  • 1/2 cup of fresh squeezed lemon juice
  • 1/2 red onion, finely diced
  • 1-2 chopped fresh seeded vine tomatoes
  • 1 chopped bell pepper, no color preference
  • 1/2 jalapeño pepper, chopped and 1/4 of the seeds, add more seeds if you want it a little hotter.
  • Salt to taste
  • Cilantro to taste, stem removed and chopped

Directions:

1. In a glass bowl with lid, like a Pyrex, combine equal parts tomatoes, onion, and bell pepper. Next add the jalapeño. Mix well with a spoon.

2.  Add cilantro and mix. Then add the salt to taste and a little bit of lime juice. The salt is to take some of the sweetness away from the lemon and lime juice.

shrimp ceviche

3. In a small saucepan on medium heat, bring the lime and lemon juice to a soft boil.

4. Add the shrimp and cook until it goes from clear to white.

shrimp ceviche

raw shrimp


shrimp ceviche

cooked

5. Add the shrimp and a little bit of the juice to the veggies and mix.

6. Enjoy! With tortilla chips, crackers, pita bread and/or guacamole.

shrimp ceviche


flatbread

BBQ Chicken Flatbread Recipe

Posted on
Follow Me on PinterestPin It

flatbread

Barbecue chicken flatbread, or what I like to call BBQ chicken pizza without the sauce. 🙂

Flatbread Ingredients:

  • dough, click here for recipe, don’t bake it yet *if you want a chewier dough use bread flour, use All-Purpose flour for a crisper dough
  • shredded chicken
  • barbecue sauce, I like Stubbs
  • diced red onion, about half of it
  • diced bell pepper, about half of it
  • olive oil

Directions:

  1. Pre-heat oven to 450°
  2. Generously coat the shredded chicken in barbecue sauce.
  3. Put about a tablespoon of oil into a skillet and put on medium heat.
  4. Place diced peppers in the pan and sauté for about 3 minutes and then add the onions. Sauté both until tender, about 7 minutes.
  5. Roll out the dough on a floured surface. Place on a greased pan and place in the oven for about 8 minutes. *This is to make sure the top is cooked all the way through before putting on the toppings.
  6. Carefully remove the flatbread from the oven and top with cheese, chicken, onions and peppers. Followed by pouring a little more barbecue sauce on top of the flatbread.
  7. Cook for another 10-15 minutes, where the cheese is melted and the bottom is cooked all the way through.
  8. Enjoy!

flatbread


shirt

How to Shorten Shoulder Straps

Posted on
Follow Me on PinterestPin It

shoulder strap

I bought a really cute top for work, the only problem is that it is not petite sized. The straps are way too long making me expose too much of myself. Luckily I knew I could easily fix this after examining the shirt.

First I needed to figure out how much to take off of the straps so I put it on and pinned them into the correct place. I then carefully removed the shirt and measured the amount I needed to take off.

Next I turned the shirt inside out and got my handy seam ripper and opened the area where the strap connects to the shirt.

shoulder strapNext, I pulled out the 2 inches it needed to be shortened by and pinned it into place. Repeat for the other strap. shoulder strap

Using matching thread and the proper needle, I sewed the shoulder straps into place, using a back-stitch at each end to make sure they’re secure. I didn’t cut off the extra because it’ll be sitting in between the two layers of the shirt so they won’t be an issue. Turn it right side out and brand new shirt that actually fits.

shoulder strap


eggplant sandwich

Eggplant Sandwich

Posted on
Follow Me on PinterestPin It

eggplant sandwich


I bought a gigantic eggplant from the store the other day. I bought it with no idea how I was going to cook it. I decided to try an eggplant sandwich, burger type thing. I did add bacon to it but it can easily be omitted to make this a vegetarian option. I liked it and my husband even enjoyed it! Now what to do with the rest of this thing, eggplant parm?

Ingredients:

  • toasted bun
  • 2 pieces of cooked bacon
  • sautéed/wilted spinach – little bit of oil and saute in medium heat until wilted
  • slice of eggplant
  • shredded mozzarella
  • some Parmesan
  • basil
  • tomato slice
Directions:
  1. Pre-heat the to oven 350°F
  2. Pour a  tiny bit of oil in a skillet on medium-high heat.
  3. Cook eggplant on each side for 2-3 minutes until it has softened.
  4. On a baking sheet, place eggplant slice, sprinkle some salt on it,  followed by bacon, then spinach and then both cheeses. Place either a fresh basil leaf or generous amount of dried basil on top of cheese.
  5. Place in the oven for about 7 minutes or until cheese is completely melted.
  6. Put tomato slice on the bottom bun and then place eggplant on top of the tomato.
  7. Enjoy! I served with sweet potato fries.

eggplant sandwich


Fixed Latch on a Canister

Posted on
Follow Me on PinterestPin It

I read the book Vitamin Water by Arnel Ricafranca. It’s a free kindle book that explains how to make your own vitamin water.  It inspired me to create my own. But I didn’t have an air tight glass pitcher or one that didn’t take up a lot of space. Then I found this glass canister at Marshalls! $3.00!!!!

canister

canister

I was so excited that I didn’t even notice it was missing part of the latch. Of course, the simple thing would have been for me to return it. But why? Of course I could fix it. First I tried a paper clip. That didn’t work because it was too flimsy. I decided to try a wire hanger. I grabbed my husband’s tools and some of my own and got to work with Gordon Ramsey yelling at the chefs on Hell’s Kitchen in the background.

canister

It took a lot longer than I expected, like 3 episodes of Hell’s Kitchen on Hulu. I thought I’d just use part of the hanger that’s already bent because it’ll be more pliable. But no, it snapped in two. So I took a piece about 3 inches long from the straight part of the bottom of the hanger and used pliers and my tiny muscles to bend it. My fingers hurt after I finished but it was worth. It’s not pretty but it works! Now I can make delicious vitamin water.

canister


wedge salad

BLT Wedge Salad

Posted on
Follow Me on PinterestPin It

wedge salad

I had a BLT wedge salad at a restaurant the other day and loved it. It’s a fun new way to eat your veggies. I needed to make it at home. It is really easy to make too! Just wash and cut your head of lettuce into 4 pieces, sprinkle your favorite salad veggies and proteins around it, dress it and you’re done!  A wedge salad is also an easy way to wow your guests at your next get together! I like to serve it with salmon and a twice baked potato or biscuits.

Serves 4

Ingredients:

  • head of iceberg lettuce
  • diced tomato seeds removed, or cherry tomatoes cut in half
  • bacon
  • blue cheese
  • blue cheese dressing

Directions:

  1. Cut off bottom/stem of head of lettuce and then cut head into 4 equal pieces
  2. Cook bacon in skillet until and break into pieces.
  3. Put quartered lettuce onto four separate plates.
  4. Sprinkle the tomatoes, blue cheese and bacon around the lettuce.
  5. Cover in blue cheese dressing.
  6. Get your knife and fork and enjoy your wedge salad!

wedgesaladwedge saladwedge salad


shredded chicken

Shredded Chicken Recipe

Posted on
Follow Me on PinterestPin It

shredded chicken

Shredded chicken is a very versatile food. You can cover it in barbecue sauce, taco seasoning or anything else you can think of; there are endless possibilities. This makes it a great meal starter and it’s super easy to make!

How I make shredded chicken:

Serves 1-2

Ingredients:

  • 2-4 chicken tenders or 1-2 chicken breasts, boneless and skinless
  • 1 cup chicken broth

Directions:

  1. Pour broth into a skillet that has a lid, bring to a boil.
  2. Reduce to a simmer and carefully place chicken into the skillet. Cover with the lid.
  3. After 4 minutes, carefully flip the chicken and cook another 3-4 minutes. *I found using tongs much easier than using a turner.
  4. Remove the chicken from skillet and place onto a cutting board. Discard the broth.
  5. With two forks, shred the chicken.
  6. Season as you wish.
  7. Enjoy!

shredded chicken