Pin It
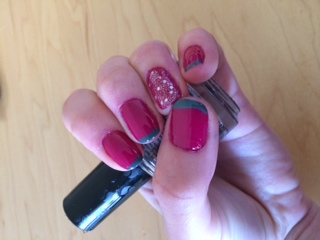
I wanted to do a French tip manicure at home but I don’t have the steadiest of hands when it comes to painting. I was looking at Chloe’s Nails Blog and liked that she uses tape to get the designs she wants and was inspired to find something similar to achieve my desired effect. I decided to try band-aids. But they have to the plastic or sheer type because the polish will soak through the fabric band-aids. For my first couple of tries, I am pretty pleased with how my nails turned out and decided to share what I did.
Things you need:
- base coat
- main color
- tip color
- top coat
- band-aid
- time
- maybe nail polish remover
How:
- Clean and prep your nails by filing, pushing back cuticles, etc
- Apply base coat and allow to dry.
- Next apply a couple of coats of the main color to get your desired color.
- Wait a few minutes and then apply a thick layer of top coat.
- Now you’ll want to wait awhile for these coats to dry, so catch up on a show or something. Also, while they are drying take out your band-aids and put the sticky side on your palm a couple times in order to take away some of the stickiness so it doesn’t pull up your polish.
- After your polish has dried, carefully place the band-aid towards the tip of the nail, just exposing the area you want to paint.
- Paint the tip. Carefully and quickly pull the band-aid off.
- Continue on the rest of your nails, you might need more then one band-aid to avoid a mess.
- Next clean up your nails. I like to use an angled craft/paint brush dipped into nail polish remover. It’s much easier for me to be more precise around my nails with a paint brush.
- Apply top coat and wait for it to dry.
- Enjoy!
My product list:
- OPI Natural Nail Base Coat
- China Glaze Traffic Jam
- Essie Vested Interest
- Seche Vite Top Coat
- Band-Aid Sheer Strips
- Glitter Polish – OPI Pirouette My Whistle
- OPI Expert Touch Lacquer Remover